18-6. ENGINE WIRING HARNESS REPLACEMENT
This task covers:
a. Removal
b. Installation
a. Removal
NOTE
Prior to removal, tag leads for installation.
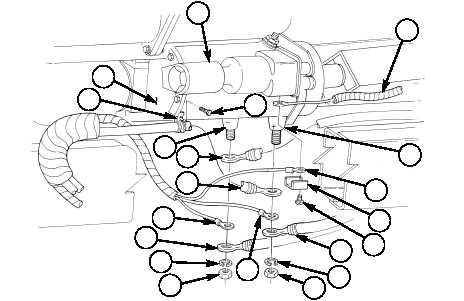
1.
Remove screw (6), clip (5), and two leads 74A (4) and 74B (2) from starter solenoid (1).
2.
Remove nut (9), lockwasher (8), winch cable 6W (7), if equipped, lead 81B (10), and battery
cable 6A (15) from starter positive terminal (3). Discard lockwasher (8).
3.
Remove nut (11), lockwasher (12), winch cable 7W (13), if equipped, lead 3D (14), and battery cable
7A (16) from starter negative terminal (17). Discard lockwasher (12).
4.
Remove screw (18), clamp (19), and battery cable 6A (15) from starter motor (20).
5.
Remove nut (35), lockwasher (34), washer (33), and lead 81A (32) from buss bar (31). Discard
lockwasher (34).
INITIAL SETUP:
Tools
General mechanic’s tool kit:
automotive (Appendix B, Item 1)
Automotive and repair: field
maintenance, basic (Appendix B, Item 6)
Special Tools
Torque adapter, 3/4-in. (Appendix B, Item 134)
Materials/Parts
Eight lockwashers (Appendix G, Item 205)
Two nut and lockwasher assemblies
(Appendix G, Item 251)
Locknut (M1114) (Appendix G, Item 172)
Adhesive sealant (Appendix C, Item 13)
Silicone compound (Appendix C, Item 73)
Antiseize compound (Appendix C, Item 16)
Grease (Appendix C, Item 33)
Manual References
TM 9-2320-387-10
TM 9-2320-387-24P
Equipment Condition
• Hood raised and secured (TM 9-2320-387-10).
• Battery ground cables disconnected (para. 4-68).
• Engine access cover removed (para. 10-22).
• Air horn removed (para. 3-14).
Maintenance Level
Direct support
TM 9-2320-387-24-2
18-34
Change 1
20
19
1
18
3
4
5
6
7
1716
15
14
13
12
11
10
8
9
2