11-22. CARGO SHELL DOOR GAS SPRING MAINTENANCE (Cont'd)
3.
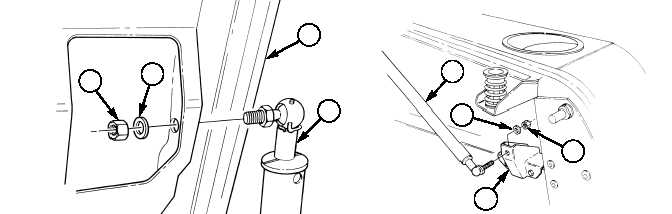
Remove two locknuts (1), washers (2), and gas spring assembly (4) from cargo door (3) and body
bracket (5). Discard locknuts (1).
1.
Remove inner spring tube (6) from outer spring tube (13).
2.
Remove two retaining rings (8) from ball studs (11) and rod sockets (12). Remove two ball
studs (11) from rod sockets (12). Discard retaining rings (8).
3.
Remove two clamps (10) from bushings (9) and spring rods (7) and (14). Pull spring rods (7)
and (14) approximately 1 in. (2.54 cm) out of tubes (6) and (13) and remove two bushings (9).
WARNING
Do not attempt to remove gas cylinders from inner spring rod or
outer spring rod. High internal pressure will cause cylinder to
explode and may result in injury to personnel.
4.
Pull inner spring rod (7) from inner tube (6) and outer spring rod (14) from outer tube (13).
c. Disassembly
TM 9-2320-387-24-2
11-44
Change 1
d. Assembly
1.
Install longer outer spring rod (14) on outer tube (13), leaving approximately 1 in. (2.54 cm) of the
small diameter portion of rod (14) exposed for installation of bushing (9).
2.
Install bushing (9) on outer spring rod (14), ensuring bushing (9) is fully seated on outer
tube (13) and rod socket (12) end is fully seated on bushing (9). Install clamp (10) and tighten.
3.
Apply grease to rod end socket (12), and install ball stud (11) on socket (12) with retaining ring (8).
4.
Repeat steps 1 through 3 for inner tube (6) and inner spring rod (7).
5.
Install inner tube (6) into outer tube (13).
e. Installation
1.
Install gas spring assembly (4) on body bracket (5) and cargo door (3) with two washers (2) and
locknuts (1). Tighten locknuts (1) to 85-110 lb-ft (10-12 N•m).
2.
Install footman loop (16) and cargo door strap (17) on cargo door (3) with two screw-assembled
lockwashers (15). Tighten screw-assembled lockwashers (15) to 21 lb-in. (2 N•m).
3.
Install two retention cables (21) on cargo door bracket (19) with two shoulder bolts (18) and
locknuts (20). Tighten locknuts (20) to 85-110 lb-in. (10-12 N•m).
c.1. Inspection
Refer to para. 10-56 for plusnut inspection and replacement.
1
2
2
3
1
4
5
4