a. Removal
b. Installation
TM 9-2320-280-20-3
12-74. ARCTIC CURTAIN ANGLE ASSEMBLY REPLACEMENT
This task covers:
a. Removal
b. Installation
INITIAL SETUP:
Applicable Models
Personnel Required
M998, M998A1, M1037, M1038, M1038A1,
One mechanic
M1097, M1097A1, M1097A2
One assistant
Tools
Manual References
General mechanic’s tool kit:
TM 9-2320-280-24P
automotive (Appendix B, Item 1)
Materials/Parts
Adhesive-sealant (Appendix C, Item 10)
Three locknuts (Appendix G, Item 87)
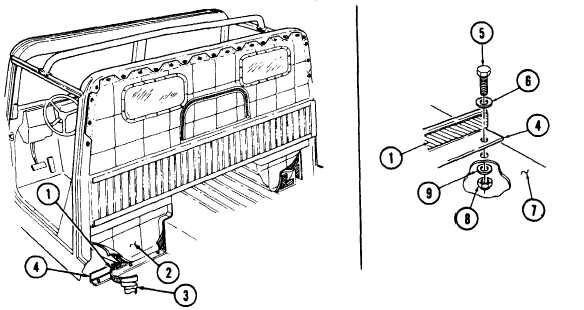
1. Peel curtain (2) back from fastener tape (1) on angle assembly (4).
2. Remove three locknuts (8), washers (9), capscrews (5), washers (6), and angle assembly (4) from
cargo floor (7). Discard locknuts (8).
3. Peel fastener tape (1) from angle assembly (4).
4. Clean remaining adhesive from angle assembly (4) surface.
NOTE
Ensure surface is free of dirt and oil before applying adhesive
backing.
1. Peel paper backing (3) from fastener taps (1) and install fastener tape (1) to angle assembly (4).
2. Install angle assembly (4) on cargo floor (7) with three washers (6), capscrews (5), washers (9), and
locknuts (8). Tighten locknuts (8) to 17 lb-ft (23 N•m).
3. Attach curtain (2) to fastener tape (1) on angle assembly (4).
12-107