Section II. ILLUSTRATED MANUFACTURING INSTRUCTIONS (Cont'd)
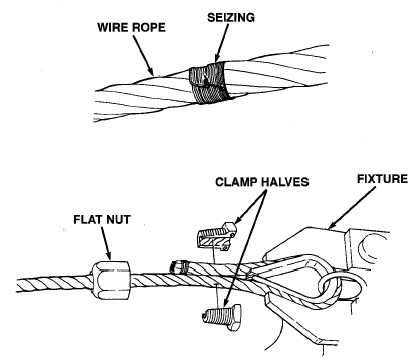
2. Position rope after seizing in a suitable fixture to make a loop, leaving enough rope to wrap around
thimble and enclose in clamp.
3. Thread wire rope through eyelid in hook, insert thimble and close jaws of fixture to enable rope to
conform to groove of thimble.
4. Place one half of clamp in position and adjust rope accordingly. The seized portion of the wire rope
should equal one rope diameter and protrude entirely beyond the threaded end of the clamp half.
5. Install clamp nut. Holding both threaded halves in position, push the nut into both halves through
the first two threads. Ensure proper alignment of both threaded halves, and that there is no cross-
threading.
6. Remove rope, clamp and thimble while still connected.
7. Hold opposing flats of clamp halves in suitable fixture and properly lubricate exposed threads with
high-viscosity lubricating oil.
8. Using a permanent marker, mark one flat nut to ensure the same opposing flats are checked before
and after tightening the clamp.
9. Using calipers, measure 1/8 inch across the flat nut from the bottom and note measurement.
10. Check to make sure clamp halves are properly secured in fixture, and tighten with appropriate
wrench.
11. Using calipers, again take measurement of the same flat nuts as was done before tightening of the
nut. If the increment dilation is between 0.004 and 0.007 inches, clamp is tight.
12. Using arbor press, crimp terminal to opposite end of wire rope.
TM 9-2320-280-20-3
Change 1
D-71