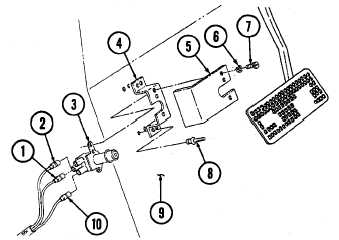
4-58. HEADLIGHT BEAM SELECTOR SWITCH AND BRACKET REPLACEMENT
This task covers:
a. Removal
b. Installation
a. Removal
NOTE
• Prior to removal, tag leads for installation.
• Pull back floor insulation for access to beam selector switch and
bracket.
1.
Remove three screws (7), lockwashers (6), switch (3), and shield (5) from bracket (4). Discard
lockwashers (6).
NOTE
For instructions on replacement of rivets, refer to para. 10-66.
2.
Disconnect leads 16A (2), 17A (1), and 18A (10) from switch (3).
3.
Remove four rivets (8) and bracket (4) from floor (9).
INITIAL SETUP:
Tools
General mechanic’s tool kit:
automotive (Appendix B, Item 1)
Riveter tool kit (Appendix B, Item 139)
Materials/Parts
Three lockwashers (Appendix G, Item 112)
Four rivets (Appendix G, Item 190)
Manual References
TM 9-2320-280-10
TM 9-2320-280-24P
Equipment Condition
Battery ground cables disconnected (para. 4-73).
1.
Install bracket (4) on floor (9) with four rivets (8).
2.
Connect leads 16A (2), 17A (1), and 18A (10) to switch (3).
3.
Install switch (3) and shield (5) on bracket (4) with three lockwashers (6) and screws (7).
TM 9-2320-280-20-2
Change 2
4-95
FOLLOW-ON TASKS: • Connect battery ground cables (para. 4-73).
• Check headlight beam selection switch for proper operation (TM 9-2320-280-10).
b. Installation


