TM 9-2320-387-24-2
I---
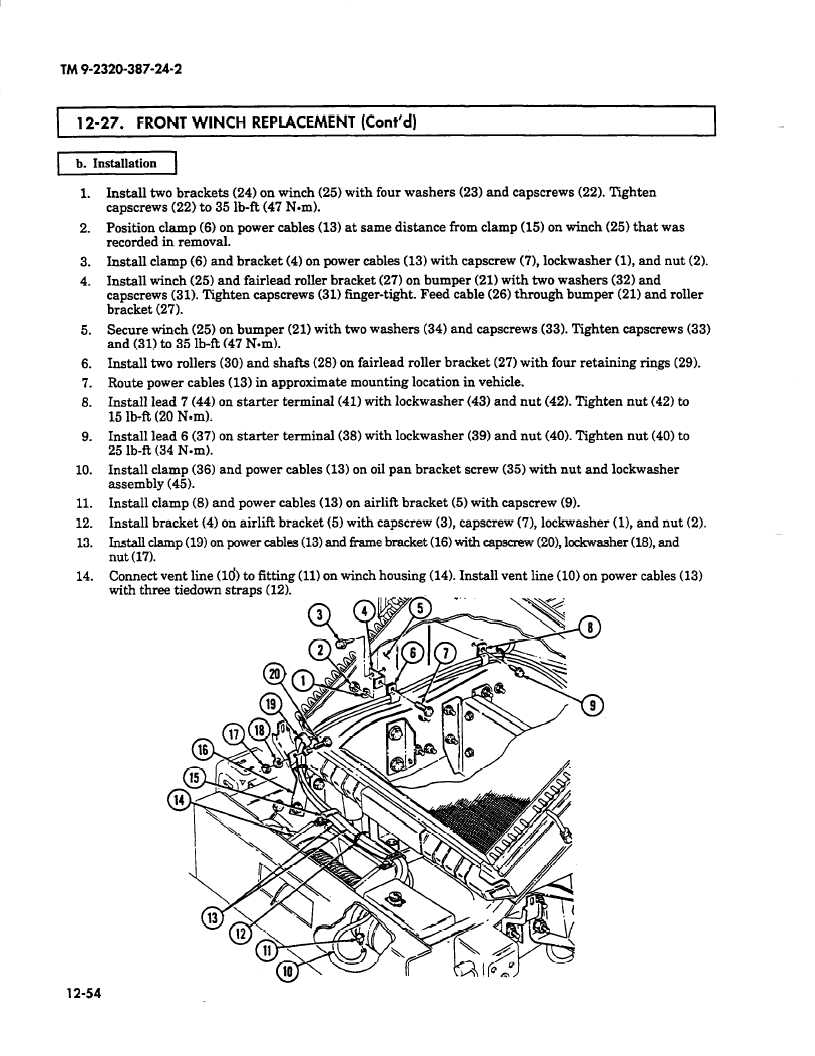
12-27. FRONT WINCH REPLACEMENT (Cont’d)
I
[]
1.
2.
3.
4.
5.
6.
7.
8.
9.
10.
11.
12.
13.
14.
12-54
Install two brackets (24) on winch (25) with four washers (23) and capscrews (22). Tighten
capscrews (22) to 35 lb-ft (47 Nom).
Position clamp (6) on power cables (13) at same distance from clamp (15) on winch (25) that was
recorded in removal.
Install clamp (6) and bracket (4) on power cables (13) with capscrew C7), lockwasher cl), and nut (2).
Install winch (25) and fairlead roller bracket (27) on bumper (21) with two washers (32) and
capscrews (31). Tighten capscrews (31) finger-tight. Feed cable (26) through bumper (21) and roller
bracket (27).
Secure winch (25) on bumper (21) with two washers (34) and capscrews (33). Tighten capscrews (33)
and (31) to 35 lb-it (47 Nom).
Install two rollers (30) and shafts (28) on fairlead roller bracket (27) with four retaining rings (29).
Route power cables (13) in approximate mounting location in vehicle.
Install lead 7 (44) on starter terminal (41) with lockwasher (43) and nut (42). Tighten nut (42) to
15 lb-i% (20 Nom).
Install lead 6 (37) on starter terminal (38) with lockwasher (39) and nut (40). Tighten nut (40) to
25 lb-R (34 Nom).
Install clamp (36) and power cables (13) on oil pan bracket screw (35) with nut and lockwasher
assembly (45).
Install clamp (8) and power cables (13) on airlift bracket (5) with capscrew (9).
Install bracket (4) on airlift bracket (5) with capscrew (3), capscrew (7), lockwasher U), and nut (2).
Install clamp (19) on power cables (13) and tie
bracket (16) with capscmw (20), lockwasher (18), and
nut (17).
Connect vent line (ld) to fitting (11) on winch housing (14). Install vent line (10) on power cables (13)
with three tiedown straps (12).