INITIAL SETUP:
Applicable Models
M1114
Tools
General mechanic’s tool kit:
automotive (Appendix B, Item 1)
Maintenance and repair shop equipment:
automotive (Appendix B, Item 2)
Materials/Parts
RTV sealant (Appendix C, Item 74)
Sealing compound (Appendix C, Item 64)
Adhesive (Appendix C, Item 4)
11-52. TURRET ARMOR AND SEAL REPLACEMENT
This task covers:
a. Removal
b. Installation
1.
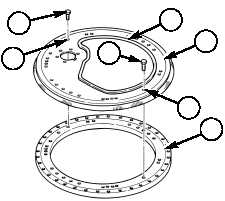
Remove seal (2) from turret armor (3). Thoroughly clean the edge of turret armor (3).
NOTE
Note location of mount holes for installation.
2.
Remove two capscrews (1) and turret armor (3) from turret bearing (5).
1.
Apply a 1/16-in. (1.6-mm) to 1/8-in. (3.2-mm) bead of adhesive to seal (2) lip.
2.
Starting somewhere other than at a corner, press seal over lip of turret armor (3).
3.
Allow seal (2) to set and cure undisturbed for about one hour.
4.
Apply sealant around turret armor mount holes (4).
5.
Apply sealing compound to capscrews (1).
6.
Install turret armor (3) on turret bearing (5) with two capscrews (1). Tighten capscrews (1) to
37 lb-ft (50 N•m).
b. Installation
a. Removal
Manual References
TM 9-2320-387-24P
Equipment Condition
• Night vision mount removed (para. 11-60).
• Turret pintle mount removed (para. 11-62).
• Turret armor brush seal removed (para. 11-51),
if required.
• Turret door removed (para. 11-53), if required.
• Turret armor hatch latch removed (para. 11-50).
• Turret hatch pivot base removed (para. 11-59).
Maintenance Level
Unit
TM 9-2320-387-24-2
Change 1
11-103
FOLLOW-ON TASKS: • Install turret hatch pivot base (para. 11-59).
• Install turret armor hatch latch (para. 11-50).
• Install turret door (para. 11-53), if removed.
• Install turret armor brush seal (para. 11-51).
• Install turret pintle mount (para. 11-62).
• Install night vision mount (para. 11-60).
1
1
4
2
3
4
5