TM 9-2320-387-24-2
1 33-7. RIVET REPLACEMENT (Cont’d) 1
d. Rivet Hole Drilling.
1. Center punch all new rivet locations. Center punch mark must be large enough to prevent drill bit
from slipping out of position, yet it must not dent the surface of the material. ‘lb prevent denting, place a
bucking bar behind material during punching.
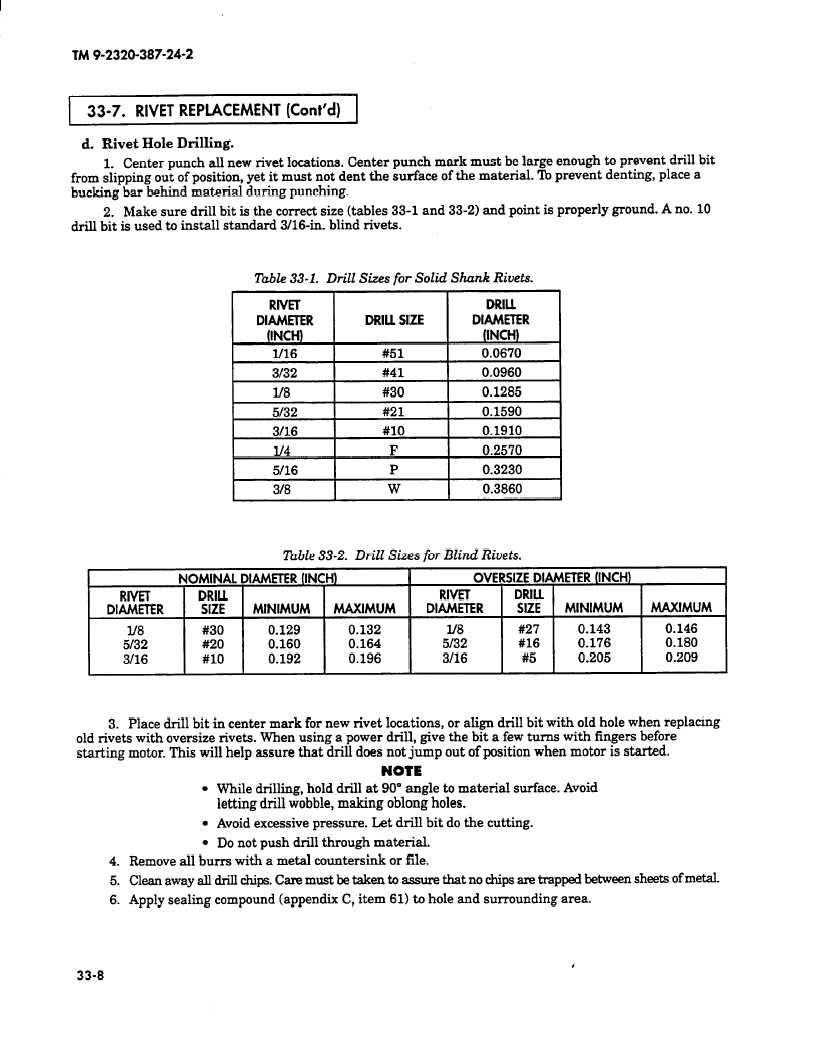
2. Make sure drill bit is the correct size (tables 33-1 and 33-2) and point is properly ground. A no. 10
drill bit is used to install standard 3/16-in. blind rivets.
Table 33-l.
Drill Sizes for Solid Shank Rivets.
RlVEl
DRILL
DIAMETER
DRILL SIZE
DIAMETER
(INCH)
(INCH)
If16
#51
0.0670
3132
#41
0.0960
If8
#30
0.1285
5/32
#21
0.1590
3116
#lO
0.1910
If4
F
0.2570
5/16
P
0.3230
3/B
W
0.3860
Table 33-2. Drill Sizes for Blind Rivets.
NOMINAL DIAMETER (INCH)
OVERSIZE DIAMETER (INCH)
RNET
%k
RIVET
DIAMETER
MINIMUM
MAXIMUM
DIAMETER
DS!!i:
MINIMUM
MAXIMUM
I./S
#30
0.129
0.132
If8
#27
0.143
0.146
5132
#20
0.160
0.164
5132
#16
0.176
0.180
3116
#lO
0.192
0.196
3116
#5
0.205
0.209
3. Place drill bit in center mark for new rivet locations, or align drill bit with old hole when replacing
old rivets with oversize rivets. When using a power drill, give the bit a few turns with fingers before
starting motor. This will help assure that drill does not jump out of position when motor is started.
NOTE
l While drilling, hold drill at 90” angle to material surface. Avoid
letting drill wobble, making oblong holes.
l Avoid excessive pressure. Let drill bit do the cutting.
l Do not push drill through material.
4. Remove all burrs with a metal countersink or file.
5. Clean away all drill chips. Care must be taken to assure that no chips are trap@ between sheets of metal.
6. Apply sealing compound (appendix C, item 61) to hole and surrounding area.
I
33-8


