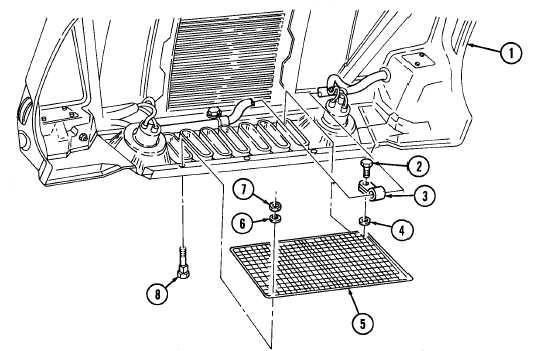
10-11. FRONT HOOD SCREEN REPLACEMENT
This task covers:
a. Removal
b. Installation
a. Removal
1.
Remove three nuts (7), washers (6), and carriage bolts (8) from front hood screen (5) and hood (1).
2.
Remove three capscrews (2), harness clamps (3), washers (4), and front hood screen (5) from hood (1).
INITIAL SETUP:
Applicable Models
M998, M998A1, M1035, M1035A1, M1035A2,
M1037, M1038, M1038A1, M1042
Tools
General mechanic’s tool kit:
automotive (Appendix B, Item 1)
Materials/Parts
Sealant (Appendix C, Item 38)
Manual References
TM 9-2320-280-10
TM 9-2320-280-24P
Equipment Condition
Hood raised and secured (TM 9-2320-280-10).
b. Installation
FOLLOW-ON TASK: Lower and secure hood (TM 9-2320-280-10).
TM 9-2320-280-20-3
10-16
Change 1
1.
Apply sealant to threads of capscrews (2).
2.
Install front hood screen (5) on hood (1) with three washers (4), harness clamps (3), and capscrews (2).
Tighten capscrews (2) to 20-30 lb-in. (2-3 N•m).
3.
Secure front hood screen (5) to hood (1) with three carriage bolts (8), washers (6), and nuts (7).
Tighten nuts (7) to 21 lb-ft (29 N•m).

