a. Removal
b. Installation
TM 9-2320-280-20-2
3-52. TAILPIPE INSULATOR REPLACEMENT
This task covers:
a. Removal
b. Installation
INITIAL SETUP:
Tools
Equipment Condition
General mechanic’s tool kit:
Tailpipe removed (para. 3-47).
automotive (Appendix B, Item 1)
General Safety Instructions
Materials/Parts
Do not touch hot exhaust system components with
Four locknuts (Appendix G, Item 106)
bare hands.
Two lockwashers (Appendix G, Item 108)
Manual References
TM 9-2320-280-24P
W A R N I N G
Do not touch hot exhaust system components with bare hands.
Severe injury will result.
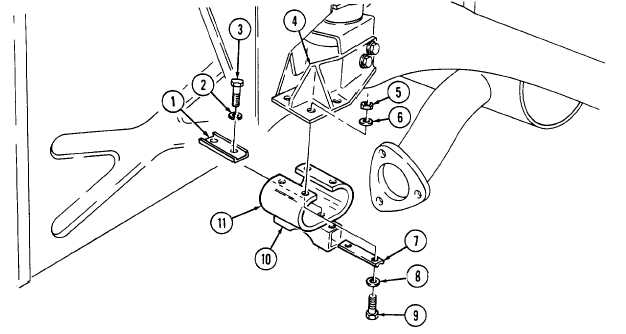
1. Remove four locknuts (5), washers (6), capscrews (9), washers (8) reinforcement plates (7) and
insulator (11) from tailpipe hanger (4). Discard locknuts (5).
2. Remove two capscrews (3), lockwashers (2), reinforcement plate (1) and U-bolt clamp (10) from
insulator (11). Discard lockwashers (2).
1. Install reinforcement plate (1) and U-bolt clamp (10) to insulator (11) with two lockwashers (2) and
capscrews (3). Tighten capscrews (3) to 10 lb-ft (14 N.m).
2. Install insulator (11) and reinforcement plate (7) to tailpipe hanger (4) with four washers (8).
capscrews (9), washers (6), and locknuts (5). Tighten locknuts (5) to 10 lb-ft (14 Nom).
FOLLOW-ON TASK:
Install tailpipe (para. 3-47).
3-95