12-25. POWER CABLE REPLACEMENT
This task covers:
a. Removal
b. Installation
a. Removal
NOTE
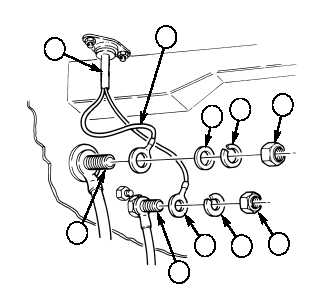
• Perform steps 1 and 2 for M1113 models only.
• Perform steps 3 through 5 for M1114 models only.
1.
Remove nut (5), lockwasher (4), washer (3), and positive lead (2) from power feed-through stud (10).
Discard lockwasher (4).
2.
Remove nut (6), lockwasher (7), and negative lead (8) from shunt stud (9). Discard lockwasher (7).
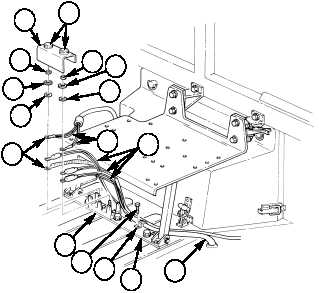
3.
Loosen terminal lugs (12) and remove cover (11) from terminal board (21).
4.
Remove two nuts (13), lockwashers (14), washers (15), power cable leads (17), and cable leads (16)
and (22) from terminal board (21).
5.
Remove screw (20), clamp (19), and power cable (1) from support bracket (18).
INITIAL SETUP:
Tools
General mechanic’s tool kit:
automotive (Appendix B, Item 1)
Materials/Parts
Four nut and lockwasher assemblies
(Appendix G, Item 245)
Two lockwashers (Appendix G, Item 217)
Two tiedown straps (Appendix G, Item 462)
Sealing compound (Appendix C, Item 70)
Manual References
TM 9-2320-387-24P
Equipment Condition
Battery ground cables disconnected (para. 4-68).
Maintenance Level
Unit
TM 9-2320-387-24-2
Change 1
12-47
M1113
M1114
1
2
3
4
5
6
7
8
9
10
11
12
13
14
15
13
14
15
22
21
2019
18
1
5
5