TM 9-2320-280-20-3
a. Removal
b. Installation
12-133. FRONT LOWER RADIO RACK REPLACEMENT
This task covers:
a. Removal
b. Installation
INITIAL SETUP:
Applicable Models
Materials/Parts
M998, M998A1, M1038, M1038A1
Six locknuts (Appendix G, Item 106)
Four locknuts (Appendix G, Item 58)
Tools
General mechanic’s tool kit:
Manual References
automotive (Appendix B, Item 1)
TM 9-2320-280-24P
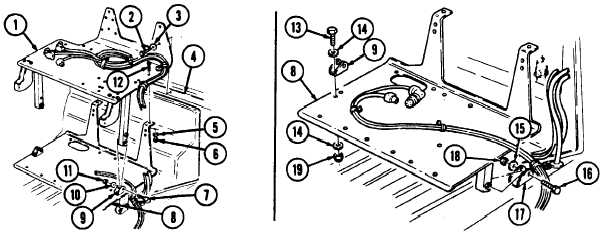
1. Remove two capscrews (2) and washers (3) from upper radio rack (1) and plenum (4).
2. Remove two locknuts (6), washers (5), and screws (12) from lower radio rack (8) and upper radio
rack (1). Discard locknuts (6).
3. Remove two locknuts (11), washers (10), capscrews (7), and upper radio rack (1) from mounting
brackets (9). Discard locknuts (11).
4. Remove four locknuts (19), washers (14), capscrews (13), washers (14), and mounting brackets (9)
from lower radio rack (8). Discard locknuts (19).
5. Remove two locknuts (18), washers (15), capscrews (16), and lower radio rack (8) from mounting
brackets (17). Discard locknuts (18).
1.
2.
3.
4.
5.
6.
Install lower radio rack (8) on mounting brackets (17) with two capscrews (16), washers (15), and
locknuts (18). Tighten locknuts (18) to 8-10 lb-ft (11-14 N•m).
Install two mounting brackets (9) on lower radio rack (8) with four washers (14), capscrews (13),
washers (14), and locknuts (19). Finger tighten locknuts (19).
Install upper radio rack (1) on mounting brackets (9) with two capscrews (7), washers (10), and
locknuts (11). Tighten locknuts (11) to 8-10 lb-ft (11-14 N•m).
Install upper radio rack (1) on lower radio rack (8) with two screws (12), washers (5), and
locknuts (6).
Install upper radio rack (1) on plenum (4) with two washers (3) and capscrews (2). Tighten
capscrews (2) to 6 lb-ft (8 N•m).
Tighten four locknuts (19) on mounting brackets (9) and lower radio rack (8).
12-206


