CAUTION
TM 9-2320-280-20-3
11-202. COMPRESSOR BELT MAINTENANCE
This task covers:
a. Removal
c. Adjustment
b. Installation
INITIAL SETUP:
Applicable Models
M997, M997A1, M997A2
Tools
General mechanic’s tool kit:
automotive (Appendix B, Item 1)
Special Tools
Belt tension gauge (Appendix B, Item 67)
Crowfoot, 14 mm (Appendix B, Item 152)
Personnel Required
One mechanic
One assistant
Manual References
TM 9-2320-280-24P
Equipment Condition
l Engine right splash shield removed (para. 10-20).
l Engine access cover removed (para. 10-15).
l Serpentine drivebelt removed (“A2” series only)
(para. 3-83).
1. Loosen two capscrews (10) from compressor (11) and support bracket (12).
2. Loosen two nuts (1) and capscrew (7) from adjusting bracket (5) and mounting ears (6).
3. Loosen nut (2) on adjusting bracket (5) and timing cover bolt (3), and push compressor (11) toward
timing chain cover (4) to loosen belt (9).
4. Disconnect fan drive hose (15) from fan drive assembly (17).
5. Remove belt (9) from compressor pulley (8), water pump pulley (14), crankshaft pulley (16), and over
fan blades (13).
b. Installation
Install belt (9) over fan blades (13) and place belt (9) on crankshaft pulley (16), water pump pulley (14),
and compressor pulley (8).
NOTE
If belt was replaced, go to step 2.
1. Perform Removal, steps a.1 through a.4.
DO not pry against compressor housing with pry bar when
adjusting belt tension. Compressor may be damaged.
2. Pull compressor (11) away from timing chain cover (4) and position pry bar between rear mounting
ear (6) and support bracket (12) to adjust belt tension.
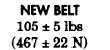
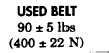
3. Using belt tension gauge, check belt (9) for proper tension (refer to table 11-1).
Table 11-1. Compressor Belt Tension Requirements
NOTE
A “used” belt iS one that has run at least fifteen
minutes or fifteen miles (24 kilometers).
11-306