TM 9-2320-280-20-3
I
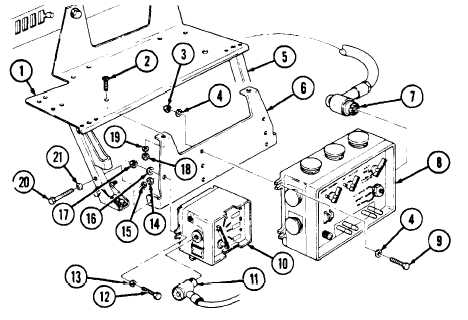
11-169. INTERCOM AND BRACKETS REPLACEMENT
This task covers:
a. Removal
b. Installation
INITIAL SETUP:
Applicable Models
Manual References
M996, M996A1, M997, M997A1, M997A2
TM 9-2320-280-24P
Tools
General mechanic’s tool kit:
automotive (Appendix B, Item 1)
a. Removal
1.
2.
3.
4.
5.
6.
7.
8.
Disconnect intercom cable (11) from intercom control (10).
Remove two nuts (17), washers (16), capscrews (12), washers (13), and intercom control (10) from
intercom mounting bracket (6).
Disconnect cable (7) from audio amplifier (8).
Remove four nuts (3), washers (4), capscrews (9), washers (4), and audio amplifier (8) from intercom
mounting bracket (6).
Remove two nuts (14), washers (15), capscrews (20), and washers (21) from intercom mounting
bracket (6) and radio rack support (5).
Remove two nuts (18), washers (19), screws (2), and intercom mounting bracket (6) from radio rack (1).
NOTE
Perform step 7 for M996 and M996A1 vehicles only.
Disconnect intercom cable (11) from intercom control (22). Remove two capscrews (24), washers (25),
and intercom control (22) from wall (23).
NOTE
Perform step 8 for M997, M997A1, and M997A2 vehicles only.
Disconnect intercom cable (11) from intercom control (26). Remove two nuts (29), washers (28),
reinforcement bracket (27), two capscrews (32), washers (31), and intercom control (26) from
body (30).
11-250