20.
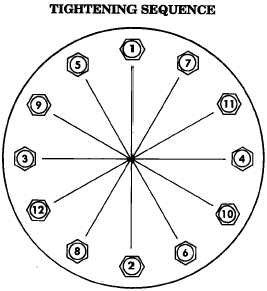
Tighten locknuts (1) to 85 lb-ft (115 N•m) in tightening sequence shown.
21.
Tighten locknuts (1) to 125 lb-ft (170 N•m) in tightening sequence shown.
22.
Check wheel assembly for gaps at each stud (2). Use a 0.0015 in. (0.038 mm) thickness gauge to
detect gaps. If gaps are detected, disassemble and reassemble wheel assembly and recheck for gaps.
If gaps are still detected, replace outer rim half (3).
WARNING
• Never inflate a wheel assembly without having checked wheel
locknut torques to ensure the wheel locknuts are tightened to
specifications. An assembly with improperly tightened locknuts could
separate under pressure, resulting in serious injury or death.
• Always use a tire inflation cage for inflation purposes. Stand on
one side of the cage, during inflation, never directly in front. Keep
hands out of the cage during inflation. Inflate assembly to
recommended pressure, using a clip-on air chuck. Do not exceed
50 psi (345 kPa) cold inflation pressure. Failure to follow these
instructions may result in serious injury or death.
23.
Place assembly in safety cage and inflate front and rear tires to recommended tire pressure
(TM 9-2320-280-10).
24.
Check for leaks around rim edges (4), insert (6), and valve bore (5) with soapy solution.
TM 9-2320-280-20-2
8-24
Change 2
8-5. RADIAL TIRE, WHEEL, AND RUBBER RUNFLAT MAINTENANCE (ALL EXCEPT M1123
AND “A2” VEHICLES) (Cont’d)