1.
Position fuel tank (5) under vehicle.
2.
Install jumper harness (6) on clamp (7) and bend clamp (7) up.
3.
Connect jumper harness leads 58J (8) and 28B (10) to body wiring harness (9).
NOTE
Use sealing compound on all vent line connector threads before
installation.
4.
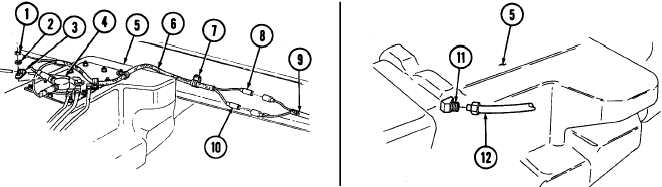
Connect vent line (4) to fuel tank (5) with clamp (3), washer (2), and locknut (1). Tighten locknut (1)
to 6 lb-ft (8 N•m).
5.
Connect vent line (12) on fitting (11) on fuel tank (5).
NOTE
Apply adhesive to threads of capscrews.
6.
Install rear strap (23) on strap bracket (22) with capscrew (21), washer (20), and locknut (19). Tighten
locknut (19) to 37 lb-ft (50 N•m).
NOTE
Ensure front straps are flush with fuel tank and to right side of
dimple in slot.
7.
Raise fuel tank (5) and install two support straps (24) to straps (17) and (23) with two
capscrews (18), washers (25), and locknuts (26). Do not tighten locknuts (26).
8.
Connect vent line (12) to tee (31) on vent line (38).
9.
Secure vent line (12) to body (34) with clamp (33) and screw (32).
10.
Connect fuel supply hoses (13) and (30) to fuel return and supply lines (16) and (15) and secure with
clamps (14).
NOTE
Perform step 11 if vehicle is equipped with an arctic heater and/or
troop/cargo winterization kit.
11.
Connect fuel supply hose (29) to arctic heater and/or troop/cargo heater fuel supply line (27) and secure
with clamp (28).
NOTE
Ensure upper and lower straps are 1/2 in. (12 mm) apart after
tightening nuts. Straps should not touch when properly installed.
Straps must be replaced if upper or lower straps touch.
12.
Tighten locknuts (26) to 23-27 lb-ft (31-37 N•m).
13.
Connect vent line (38) to filler spout (39).
14.
Secure vent line (38) to body (34) with clamp (35), washer (36), capscrew (47), washer (36), and
locknut (37).
3-24. FUEL TANK MAINTENANCE(Cont'd)
f. Installation
TM 9-2320-280-20-2
3-46.2
Change 2